This is an update post for the Jeffrey Court Renovation Challenge – where I attempt to completely remodel our bathroom in just six short weeks. You can follow our plans and get to this point by reading the posts here:
SEE THE FINAL REVEAL OF THE BATHROOM HERE
And don’t forget to vote for my bathroom! It’s super easy…just click the link below, scroll down until you see my picture, then click vote. It takes ten seconds, but your support means the world! You can vote once per day per device until the competition ends.
We’re finally getting to the pretty stuff this week and I’m so excited! On Wednesday and Thursday I sealed and grouted my marble floor. I used TileLab Surface Guard Sealer and FusionPro sealant and I am very happy with both of these products. I only wish I had bought the smaller containers. I barely used any, and even after I tile the shower, I end up with a ton of leftovers.
Once the grout was safe to walk on, we brought the brand new sink in from the garage. I have been so excited to get it out of the shipping box and see it in the room!
I chose this vanity because it looked like a dresser. I searched high and low for an antique chest of drawers to use here, but I just couldn’t find one that was the right size in time to meet the contest deadline. So instead I settled for a new vanity that looked like a dresser and I’m installing these lovely antique hepplewhite style cabinetry.

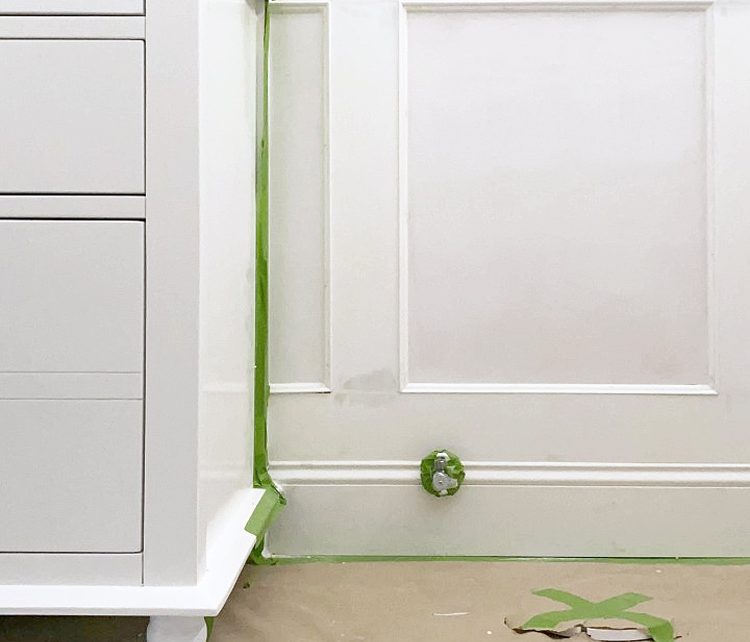
The third major achievement of the week was installing the wall treatment with rails. Boy was that challenging! We knew we wanted a super traditional look and hit the inlaid boxes. Give me all the thick shaping! This is what it looks like after assembly, nail holes and grouting.

The wainscoting consists of the following parts:

The cap trim sits on top and is made of PVC.
Next is 1/2×4 inch MDF rails (horizontal pieces) and styles (vertical pieces) . These pieces came with a round over on one side, so we ran them through the table saw to square the edges. We used them because the 1/2 inch size was the perfect depth to go with the other pieces and they were the only option we could find in stock.
Each rectangle center was filled in with 1/4 inch plywood to create a smooth surface for painting. If your walls are smooth, you can probably skip this step, but I really hate being able to see plaster texture in wainscoting. It cheapens the look in my opinion.
Each box was then trimmed with a decorative bay piece mitered at each corner. I think this little trim piece is the difference between a « farmhouse » style and a more traditional style.
The baseboard on the bottom is the same 5″ baseboard we have throughout our home, but we had to tear down 1/2″ strips of plywood to nail behind so the baseboard would fit at the correct depth with the other trim pieces.
I told you it was complicated!!
But what killed us was actually trying to get the trim to fit seamlessly around the vanity.

It took us a good eight hours of problem solving, trying one thing after another and cutting all kinds of crazy shapes to get the vanity and molding to play together. Just look at the picture above and think of the crazy shapes you have where the back vanity edge hits the molding. Yes. It was hard to figure out.
But this is my motto. Repeat after me:
Caulk and paint make things what they are not.
The primer is drying as I write this and then it’s time to paint. SURPRISE… the wainscoting doesn’t stay white! Ahhh! I’m annoyed by this color choice. I swear I googled every color ever made. I bought enough samples that if I mixed them together I could paint an entire room.

In the process, I found a truly wonderful resource for determining paint colors. The website is called Encycolorpedia. You can search any paint color name and it will tell you the hex color code so you can compare it to other colors.
Here is a small sample of how I used Encycolorpedia to help me.

Whenever I saw a photo on Instagram or Pinterest with a paint color I thought might be « the one, » I looked it up on the website and dragged the thumbnail into Photoshop. Man, seeing colors next to each other really helps you understand what you’re seeing! The site also gives you the light reflective value (how light or dark a color is) so you can compare that as well.
After much staring at paint swatches and going back to the store for « just one more color », I chose one of the shades above. Want to guess which one? Come back next week to see if your guess is correct!
We’re still waiting for the plumbing fixture to arrive so we can install valves and pipes behind the walls, get them closed, and then get the dang shower tiled. I get heart palpitations just thinking about it. Fingers crossed that our shipment gets here ASAP!
TO-DO LIST:
Remove old tile around bathtub and showerRemove old tile floorRemove debrisRemove old vanityAdd outlet behind vanityMove the light box downRepair plasterRemove the toiletClean floors and preparationsLay down cement boardTape and cement seamsTiled floorDense floorJointed floor- New plumbing valves in shower
- Install cement board in the shower cubicle
- Tape + mud
- Redgard
- Tiled shower room
- Seal shower enclosure
- Sealant shower enclosure
Install vanityMolding on the wallSand, sealant,priming and paint molding- The tape over lists
- Install a new toilet
- Install lights, mirrors, towel rails, decor, etc.
It’s crunch time! Are you scared? I’m afraid!


